Cinnamon and Raisin Bagels

Ingredients:

For the bagels:

  • 2 1/4 cups warm water
  • 4 teaspoons liquid honey
  • 1 tablespoon active dry yeast or use instant yeast
  • 5 3/4 cups all purpose flour
  • 2 1/4 teaspoons sea salt
  • 2 teaspoons ground cinnamon
  • 2 tablespoons raw sugar or use brown sugar
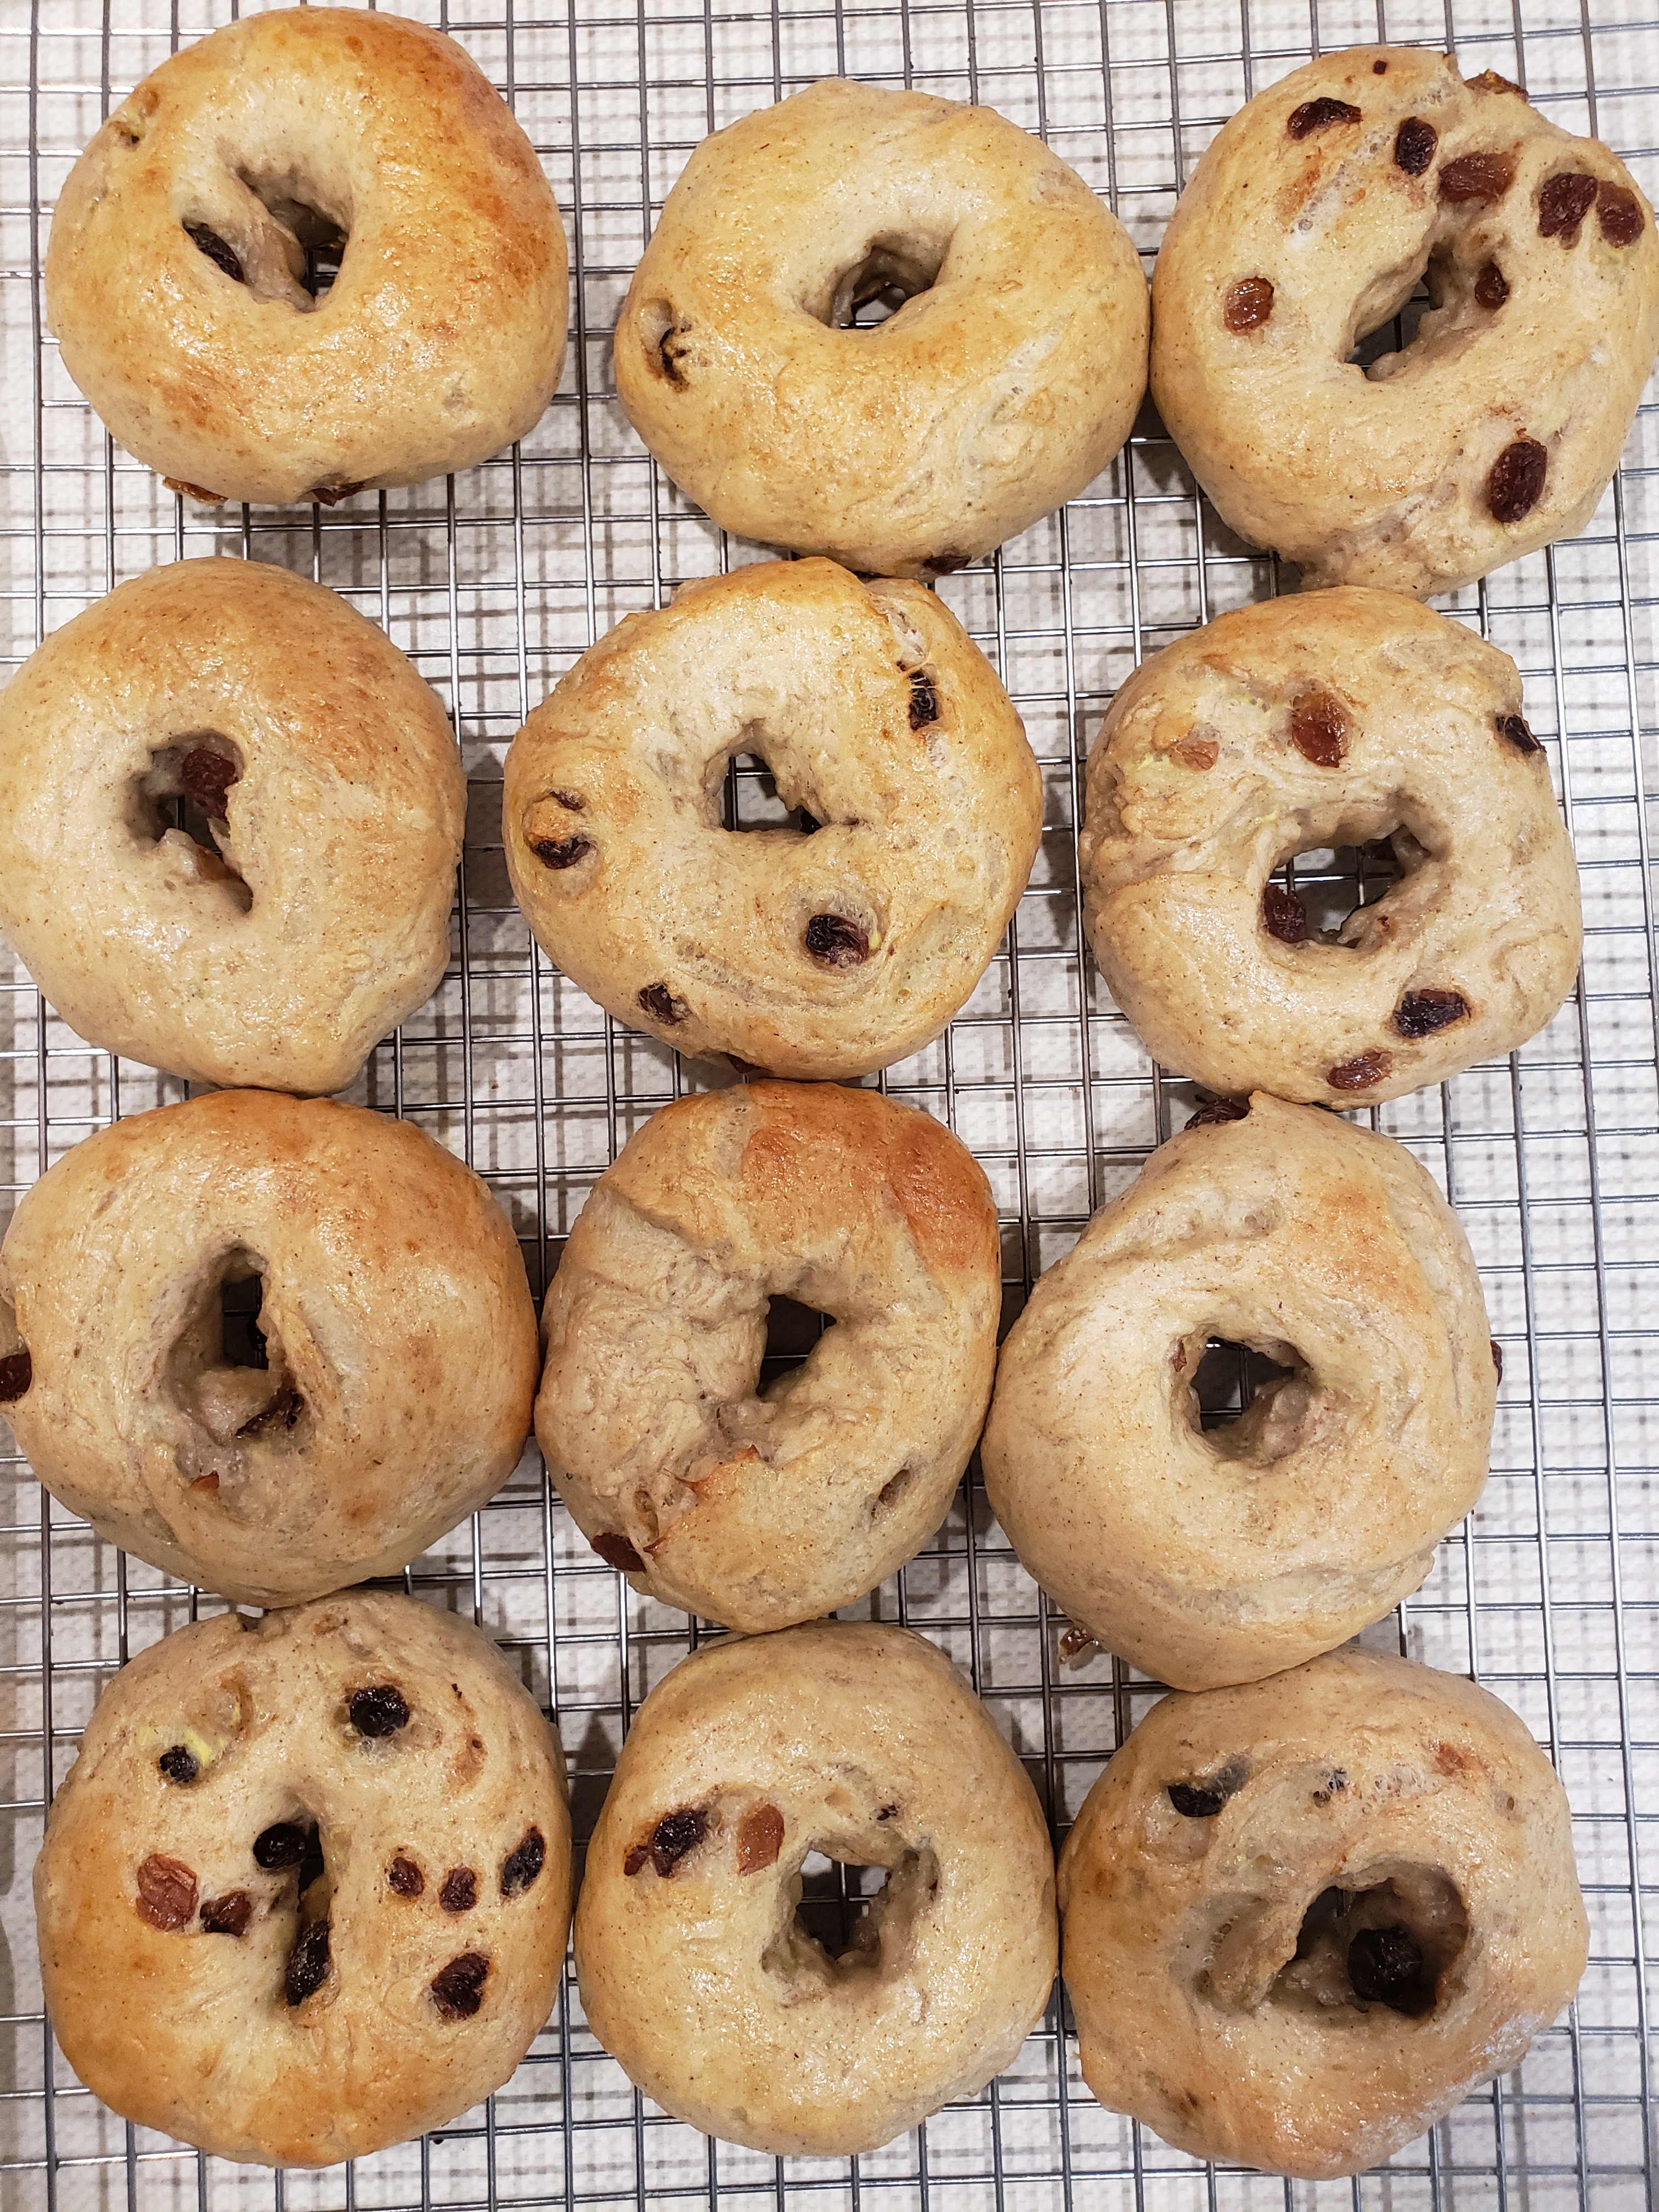
  • 1/2 cup raisins

There are variations on this including using maple syrup instead of honey. I also prefer using active dry yeast in this recipe so maybe avoid the instant yeast unless of course that is all you have.

For boiling:

  • 10 cups water
  • 1/4 cup liquid honey or maple syrup

For the egg wash:

  • 1 egg
  • 1 tablespoons water

Method:

  1. Add the water, honey and yeast to a liquid measuring cup and set aside for the yeast to begin to grow (about 5 minutes).
  2. Measure the flour and salt into a large bowl and whisk together, along with the cinnamon, sugar and raisins. I got greedy for raisins one time and added more than the recipe called for. Big mistake. Stick to the recipe or your bagels will not succeed but fall apart as you try to form them.
  3. Add the yeast mixture to the flour mixture and mix together well with a wooden spoon or a rubber spatula until a rough dough forms.
  4. Turn the dough out onto a well floured surface and knead for about 10-15 turns until the dough forms a ball and isn’t too sticky.
  5. Add the dough ball back into the bowl and cover with plastic wrap, letting it rise for about 60-90 minutes or until the dough doubles in size. Okay this will work but I like to put the dough in the fridge after it rises and leave it overnight. My usual thing is to make the dough in the early evening and put it away in the fridge until morning when I make the bagels. Trust me this makes a world of difference.
  6. Once the dough has risen or been taken out of the fridge, turn it out onto your work surface (flour the work surface a little bit, but this dough is a bit on the dry side to don’t add too much flour!)
  7. Add the water and honey to a pot and let it come to a low boil, turning the heat to medium after it boils to maintain a very gentle boil.
  8. Preheat your oven to 425 degrees Fahrenheit and prepare 2 baking sheets by lining them with parchment paper.
  9. As you wait for the water to boil, divide the dough into 12 pieces (as evenly sized as possible). Roll each piece into a ball with a smooth surface.
  10. To form a bagel shape, press your middle and ring finger (together) into the centre of one ball to make a hole right through the middle. Move your fingers gently in a  circular motion to make the hole a little bit bigger.
  11. Then, holding the bagel with your thumbs inside the hole, pick it up off the work surface and stretch it gently to make the hole bigger. The goal is to make the hole a little bigger than you actually want it, as the dough will shrink back slightly during baking.
  12. Let the bagels you’ve formed sit on the work surface for about 5 minutes before gently lowering them into the boiling honey water 1 or 2 at a time.
  13. Let the bagels boil for about 1 and a half to 2 minutes per side. Don’t skip this step! This is what gives bagels their chewy texture and perfect crust and baking them without boiling will not give you the same result.
  14. After boiling, place the bagels on a parchment paper-lined baking sheet (6 bagels per large baking sheet).
  15. Whisk the egg and water together and brush the mixture lightly over the tops of the bagels.
  16. Bake at 425 degrees Fahrenheit for about 15-18 minutes, or until golden brown.
  17. Let the bagels cool on the baking sheet for a few minutes before moving them to a wire rack to cool completely.

Crumpets

Ingredients

  • 150g (1 cup) white flour , plain / all purpose
  • 200ml (3/4 cup + 1 tbsp) warm water , tap water (200g) (Note 1)
  • 1/2 tsp salt , cooking/kosher salt (1/4 tsp table salt)
  • 1/2 tsp white sugar
  • 1 tsp baking powder

YEAST MIXTURE

  • 1 tsp yeast , instant/rapid rise OR dry active yeast (Note 2)
  • 1 tbsp warm water (just tap water)

COOKING:

  • 2 tbsp unsalted butter , melted (or vegetable oil)

Instructions

Crumpet Batter: Place flour, water and salt in a bowl and whisk for 2 minutes (electric beater 1 minute on speed 5).

Yeast Mixture – Dissolve Yeast into 1 tbsp warm water in a small bowl.

Add Yeast Mixture, sugar and baking powder into bowl, then whisk for 30 seconds (or 15 sec speed 5).

Cover with cling wrap or plate, then place in a very warm place for 15 to 30 minutes until the surface gets nice and foamy. It will only increase in volume by ~10 – 15%.

COOKING CRUMPETS:

Grease 2 or 3 rings with butter (approx 9 cm / 3.5″ wide, though any ring or metal shaper will do, Note 3) (TIP: Non stick rings – brush with melted butter. Everything else – smear with butter)

Brush non stick skillet lightly with melted butter then place rings in the skillet.

Turn stove on medium high (medium for strong stoves) and bring to heat (Note 4 for “sizzle test”).

Pour 1/4 cup batter into the rings (65ml), about 1cm / 2/5″ deep (will rise ~60%).

Cook for 1 1/2 minutes – bubbles should start appearing on the surface (but not popping yet).

Turn heat down to medium, cook for 1 minute – some bubbles should pop around the edges.

Turn heat down to medium low, cook for a further 2 1/2 to 4 minutes, until the surface is “set” and it’s clear there will be no more bubbles popping! (At this stage you can help the final bubbles pop with a skewer!)

Remove rings (you might need to run knife around to loosen).

Then flip and cook the other side for 20 to 30 seconds for a blush of colour.

Transfer to write rack (golden side down) and fully cool. Can be eaten once cool, but it’s even better the next day (Note 5).

HOW TO EAT CRUMPETS:

  1. Toast in a toaster until the base is crispy.
  2. Slather generously with butter, then spread of choice (honey is perfection) and devour immediately!

 Recipe Notes:

1. Warm water – just tap water, warm enough that you’d want to take a bubble bath in it, not so hot that you’d scorch yourself.

200ml = 200g (handy so you can just pour straight in rather than measuring out separately!)

2. Yeast – original recipe calls for normal active dried yeast. Works exactly the same with instant / rapid rise yeast – tried with both, no difference.

Fresh yeast – Haven’t tried but see no reason why it wouldn’t work using the standard conversion of 7.75g / 0.275 ounces fresh yeast per 1 teaspoon of dry yeast. Crumble into the warm water with the 1/2 tsp sugar per recipe, and follow recipe as written.

3. Rings – anything round like biscuit cutters, egg rings or even a cleaned empty tuna can (remove top and bottom, clean thoroughly and use labels, grease well).

Though why restrict yourself to round?? Any cookie cutter will work here!

4. Pan heat – the batter needs to sizzle gently when it hits the pan, otherwise it’s not hot enough to get the bubbles happening. But if too hot, the crumpets will burn!

TEST by putting a dab of batter on the end of a butter knife and pressing it on the skillet. Sizzle = hot enough. There should not be wisps of smoke coming from the pan at this stage (too hot).

COOKING TIP: 

Heat control is key to crumpet success! You need stronger heat at the begin to get the holes bubbling, then lower heat so the crumpet cooks through without burning the base BUT still strong enough to make the bubbles “pop”. The temps provided in the recipe are for a standard stove – if yours is extra strong (like the portable one I use for videos), dial it down a bit.

Bubbles will start to pop around the edges first, then in the centre. There can be some wisps of smoke from the butter around the rings, but if it gets quite smokey, it means the skillet is too hot. If this happens, remove skillet from stove to cool it down a bit, then return it to the stove.

5. Texture of crumpets really becomes just like store bought if you leave them overnight, more of that signature “rubbery” texture (I realise that sounds totally off-putting but I don’t know how else to describe it!).

6. Crumpet height / size – makes 6 crumpets using 9cm / 3.5″ rings that are about 1.7cm / 2/3″ high (store bought height). If you want to go a bit trendy-bistro style and make thicker ones, use a heaped 1/4 cup (about 1/4 cup + 1 tbsp) for each ring – you will get slightly less holes on the surface (thicker = less holes) but can make them about 2.2cm / just shy of 1″ thick which looks very puffy and impressive – some trendy bistros charge upwards of $20 for house made thick crumpets!

6. Gluten free flour – this doesn’t work with gluten free flour. Tried and it was a dismal fail!

7. Different cup sizes – cups and tablespoons differ slightly between countries (with the US having the greatest variance to the rest of the world). It’s best to make this recipe with the provided weights if you can, for absolute accuracy. But I did make it using US cups mixed with Aussie tablespoons and it works just fine. So it seems to be a pretty forgiving batter – it’s the stove cook temp that makes the most difference.

8. Store in an airtight container in the fridge for 4 days or freeze 3 months.

Blueberry Crumble Mini Cheesecakes

Equipment

  • Standard Muffin Pan

Ingredients

Crust

  • 1 1/3 cups graham crackers
  • 1/4 tsp cinnamon
  • 2 1/2 Tbsp sugar
  • 6 Tbsp butter melted

Crumb Topping

  • 1/2 cup all-purpose flour
  • 1/4 cup quick oats
  • 1/4 cup light-brown sugar + 2 Tbsp
  • 1/4 tsp ground cinnamon
  • 1/8 tsp ground nutmeg
  • 1/4 cup butter melted

Cheesecake Filling

  • 2 8 oz cream cheese softened
  • 2/3 cup granulated sugar
  • 2 large eggs
  • 1/4 cup sour cream
  • 1 1/2 teaspoon vanilla or vanilla bean paste

Blueberries

  • 2 teaspoons sugar
  • 2 teaspoons all-purpose flour
  • 1 tablespoon fresh lemon juice
  • 1 cup fresh blueberries rinsed and patted dry

Instructions

  1. Preheat oven to 350 degrees. Line 16-18 muffin cups with liners. In a mixing bowl combine graham cracker crumbs, cinnamon, melted butter and sugar together.
    1. Divide mixture and press inside the bottom of a muffin cups to form little crusts. (about 1 tablespoon) Bake for 5 minutes. Remove from oven to cool.
    1. Meanwhile in a small mixing bowl, combine all blueberry ingredients, toss gently to combine, set aside.
    1. In a medium size mixing bowl, combine all ingredients for crumble topping. Cut the butter in with a pastry blender until the mixture is coarse, set aside.
    1. In the bowl of your electric mixer blend together cream cheese with sugar just until smooth. Mix in eggs one at a time, then blend in sour cream and vanilla.
    1. Once well combined, pour on top of your mini graham cracker crusts, leaving room at the top for fruit and crumb.
    1. Carefully place blueberry mixture over the top, evenly covering mini cheesecakes. Finish by sprinkling a heaping tablespoon of the crumb over tops.
    1. Bake at 350 F for 25-30 minutes, until the crumble is lightly golden brown in color. Once it’s done cooking, cool for 30 minutes, then refrigerate at least 4 hours or overnight.

Notes

NOTE: It’s really important that the cream cheese, sour cream and eggs are at room temperature, otherwise you’ll end up with a clumpy batter!

English Muffins

Ingredients

  • 2 cups (480 ml) whole milk
  • 3 tablespoons honey
  • 2 ¼ teaspoons active dry yeast, (1 packet) SEE NOTE 1
  • 1 large egg
  • 4 tablespoons unsalted butter, melted
  • 5 cups (650 g) bread flour
  • 1 and ½ teaspoon salt
  • cornmeal for dusting

Instructions

  1. In a small saucepan, heat the milk and honey over low heat until it reaches 105-115ºF. Remove from heat, stir in the yeast, and set aside for 5 mins. Whisk in the egg and melted butter.
  2. Add the flour and salt to the bowl of a stand mixer. Fit the mixer with the dough hook attachment. with the mixer on low speed, gradually pour the milk mixture into the flour. 
  3. Continue to beat on low until the flour is incorporated, stop and scrape down the sides and bottom as needed. Turn the speed up to medium and mix for about 4 minutes, until the dough is smooth and sticky.
  4. To be honest you don’t need to use a mixer. I use a wooden spoon which takes a bit more elbow grease but works just fine.
  5. Scrape the dough out into a lightly oiled bowl. Brush a little oil over the top of the dough. Cover and set in a warm place to rise for 1 hour or until doubled in size.
  6. Turn the dough out onto a lightly floured surface, using as little flour as possible, gently knead the dough together. (The dough is very sticky. Add just enough flour to make it easy to handle.) 
  7. Divide the dough in half. Divide each half into 8 equal sized pieces. You should have 16 dough balls. (If you want smaller muffins, divide each half into 11 pieces to equal 22 dough balls.) Roll each piece into a ball and flatten the ball into a disk. 
  8. Place the disks on a baking sheet lined with parchment paper that has been dusted with cornmeal. Sprinkle more cornmeal over the tops. Cover with a lint-free towel and set in a draft-free place for 1 hour, or until doubled in size.
  9. Preheat the oven to 325ºF.
  10. Heat a griddle over medium-low heat. Gently lift each disk with a plastic spatula and place it on the griddle. (Handle the dough with care so you don’t deflate it) Cook them for about 2 minutes on each side, until lightly browned on both sides. Work in batches. I have found that this step is the most difficult. The temperature of the stove, the pan or griddle you use will vary the time. The 2 minute guideline is good but keep an eye on the muffins to be sure they don’t burn.
  11. Place the muffins back on the cookie sheet and bake them for 10-15 minutes. The internal temperature should be about 200°F on an instant-read thermometer.
  12. Transfer the muffins to a cooling rack and let them cool completely.
  13. Split the English muffins with a fork and toast them in a toaster until the edges are lightly browned. Serve warm with your favorite jam or butter. 

Oatmeal Cookies with Dried Fruit, Chocolate Chips and Pecans

INGREDIENTS

  • 2 cups all-purpose flour
  • 1 teaspoon baking powder
  • 1 teaspoon ground cinnamon
  • 1/2 teaspoon baking soda
  • 1/2 teaspoon salt
  • 3/4 cup (1 1/2 sticks) unsalted butter, room temperature
  • 1/4 cup solid vegetable shortening, room temperature
  • 1 cup sugar
  • 1 cup (packed) dark brown sugar
  • 1/4 cup maple syrup
  • 2 large eggs
  • 1 tablespoon vanilla extract
  • 3 cups old-fashioned rolled oats
  • 1 cup chocolate chips
  • 1-3  cups dried fruit  (blueberries, raisins, cherries, and/or cranberries etc.) Really as much as you like
  • 1 cup chopped pecans

PREPARATION

Preheat oven to 350°F. Blend first 5 ingredients in medium bowl. Using electric mixer, beat butter and both sugars in large bowl until fluffy. Beat in maple syrup, eggs, and vanilla. Gradually beat in flour mixture. Stir in oats, dried fruits, chocolate chips and pecans. Drop batter by tablespoonfuls onto prepared sheets, spacing mounds 2 inches apart. Flatten cookies slightly. Bake cookies or until golden brown, about 10 minutes. Cool completely on cookie sheets.

The recipe I based this on called for dates instead of dried fruits. I don’t really like dates so I decided on the dried fruit. Also I just add lots of dried fruit and chocolate chips with no attention to the recipe. Its more about what you like. Pretty much a no fail recipe.

Ultimate Devil’s Food Cake

If you can believe it, this cake came from a McCall’s Magazine published in 1949 and is, in my opinion the best damn chocolate cake ever. Even better than what Trump served to Chinese President Xi Jinping at Mar-a-Lago. It is a huge three layer cake and of course you need not use the icing suggestion but the cake itself is pretty much no fail and tastes great.

Ingredients

  • 2 ½ cups of sifted cake flour
  • 2 tsp of baking soda
  • 1 tsp  salt
  • ½ cup of butter
  • 2 ½ cups of brown sugar (firmly packed)
  • 3 eggs
  • 3 x 1 oz  squares of unsweetened chocolate
  • ½ cup of buttermilk
  • 2 tsp of vanilla
  • 1 cup of boiling water

Method

Set the oven at 375 degrees F. and grease 3 8” cake tins and dust with flour

Sift the cake flour and sift again with the baking soda and salt.

Cream the butter in a separate bowl until light and fluffy. Add the brown sugar a little at a time and continue creaming until fluffy and light. Add unbeaten eggs one at a time. Beat well after adding each egg. Melt the chocolate and mix it in thoroughly with the butter mixture.

Mix about 1/3 of the flout in the batter and stir well. Add 1/3 of buttermilk and mix. Alternate flour and buttermilk until all is added. Now mix in the vanilla and boiling water. Pour the resulting batter into the cake tins (the batter is very thin but don’t be alarmed – it’s going to be okay). Bake for 25- 30 minutes. Ice with Whipped Cream Frosting. (see below)and sprinkle with grated chocolate for an amazing 3 layer cake.

 Whipped Cream Chocolate Frosting

Ingredients

  • 1 ½ cups of whipping cream
  • ¼ cup sugar
  • 2 tbsp cocoa
  • ½ tsp vanilla extract

Mix all the ingredients in a bowl (mix – don’t whip). Place in the refrigerator to chill for 2 hours at least. Then remove and beat until the mixture is so thick it holds its shape and will stand in peaks. You are ready to frost your cake. The layers rise while cooking and I find it is necessary to flatten the bottom and middle layers by cutting the rounded top off each layer to allow the cakes to sit on top without slipping off .

Regal Pecan Tart

This recipe elevates pecan pie from hearty fare to haute cuisine. While baking, pecan halves rise to the surface through a rich, dark, chestnut-brown custard, forming concentric rings of toasted nuts. Towering above all others in taste, size and appearance, this dessert is fit for royalty. I stole this recipe from a great dessert cookbook. I made a major change however. The original recipe calls for corn syrup which is fine but…. use dark maple syrup instead. It elevates the pie from royalty to heavenly.

Preheat oven to 350

Ingredients

Crust

  • 1 cup all-purpose flour
  • ¼ cup powdered sugar
  • 12 tablespoons (1½ sticks) unsalted butter, cold and cut into 12 pieces for food processor;
  • at room temperature if using a mixer

Baking Pan
9 x 3-inch or 9½ x 2-inch springform pan

Filling
¼ cup firmly packed dark brown sugar
3 tablespoons unsalted butter, at room temperature
3 large eggs, at room temperature
¼ cup dark maple syrup
2 teaspoons vanilla
¼ teaspoon salt
2 cups chopped pecans (about 8 ounces)
1 ½ cups pecan halves (about 6
ounces)
Whipped cream or vanilla ice
cream for serving (optional)

Method

Crust

Place flour, sugar, butter and salt in food processor fitted with metal blade or in medium-size bowl. Mix until dough holds together and forms a soft ball. Press pastry evenly over bottom and 1inch up sides of springform. Prick crust with fork and set aside.

Filling

Beat brown sugar and butter in large bowl with electric mixer on medium speed until fluffy, about 2 minutes.  Add eggs, syrup, vanilla and salt. Mix thoroughly.  Sprinkle chopped pecans over bottom of crust and cover with half the filling. Place pecan halves in concentric circles over entire top of pie. Pour remaining filling carefully over pecans.

Place pan on baking sheet. Bake in the 350° oven for 60 to 70 minutes or until knife inserted into middle comes out clean and pastry is golden. (*) The tart may be kept covered at room temperature or in the refrigerator overnight, or it may be frozen in springform covered with plastic wrap and foil, if desired. Defrost wrapped tart at room temperature.

Serve tart at room temperature or reheat in 350° oven for 15 minutes and serve warm. Before serving, remove sides of springform. Serve with whipped cream or ice cream, if desired.

Fennel and Apple Slaw

Dressing

  • 2 tbsp cider vinegar
  • Salt and freshly ground pepper
  • ¼ tsp ground fennel or fennel pollen
  • ½ tsp of grainy mustard
  • ¼ cup olive oil

Slaw

  • 1 crisp tart apple (Cortlands or Spy’s are good) unpeeled
  • 1 small fennel bulb – trimmed and cored
  • 2 tsp of chopped fresh thyme
  • ½ cup of thinly sliced red onion

Method

  • Whisk together the dressing ingredients
  • Using the julienne blade of a mandolin grate the apple and fennel and combine in a bowl with the onion and other slaw ingredients
  • Add the dressing and toss, season to taste with salt and pepper

This salad is great with fish like salmon or tuna.

Serves 4.

BRUSSELS SPROUTS WITH SHALLOTS AND MUSTARD

1/4 cup (50 mL) olive oil
2 tbsp (25 mL) balsamic vinegar
1 tbsp (15 mL) Dijon mustard
8 shallots, peeled and halved
2 lb (1 kg) Brussel sprouts, trimmed and cut in half
Salt and freshly ground pepper
3 tbsp (45 mL) butter
1 cup (250 mL) chicken or vegetable stock or water
2 tbsp (25 mL) chopped fresh dill

  1. Preheat oven to 425°F (220°C).
  2. Whisk together olive oil, vinegar and Dijon mustard. Toss with shallots and Brussels sprouts. Season with salt and pepper.
  3. Lay sprouts and shallots in single layer on baking sheets.
  4. Bake for 20 to 25 minutes or until sprouts and shallots are tender and browned. Reserve.
  5. Place butter in large skillet over medium heat. Add sprouts and shallots and toss until heated. Pour over stock and bring to boil. Reduce until stock thickens and sprouts glisten. Sprinkle with dill.

Poppy Seed Cake

Ingredients

  • 1 ½ cups of butter
  • 2 cups ground poppy seeds
  • 1 ½ cups sugar
  • 5 eggs separated
  • 2 tsps milk
  • 2 tsps Brandy
  • ¾ cup flour/cornstarch (half flour/half cornstarch)
  • 1 tsp baking powder

Method

  • Melt the butter and add sugar, poppy seeds, milk and brandy and egg yolks and mix thoroughly
  • Mix the flour, corn starch and baking powder together.
  • Add the flour mixture to the liquid and mix well.
  • Beat the egg whites until stiff and fold in to flour mixture
  • Pour into buttered 8 inch square pan and sprinkle the top with grated chocolate.

Bake 10 minutes at 425, 10 more minutes at 375 and a final ten minutes at 325. I actually think you can play with the timing a bit and be sure your baking powder is no more than a year old. Baking powder is the key to rising and if it is a year old it loses its ability. I find cakes like this need to be watched and don’t hesitate to leave it in longer if you need to. That way the centre of the cake will be cooked through.